


Function Factory Performance Goes On Vacation: M Track Days, The Ultimate Experience at Circuits Of The Americas
August 5, 2018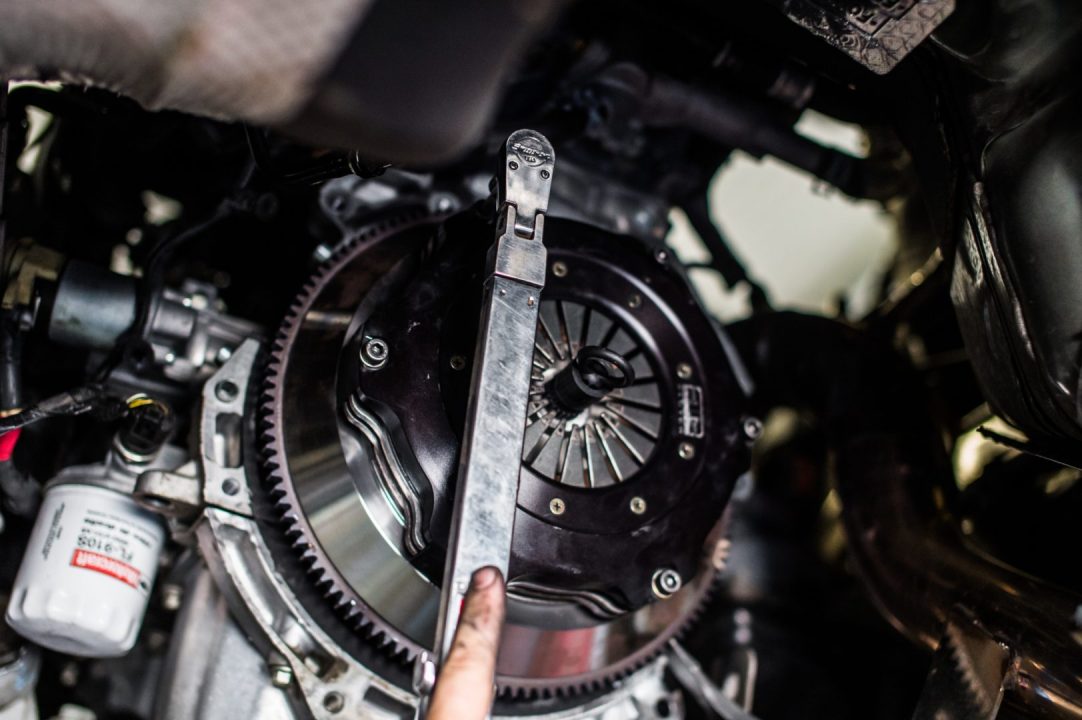
Installing The Competition Clutch Twin Disc For Ecoboost Mustang
September 9, 2018

It has been almost two years for The Function Factory, Function Factory Performance, Full-Race Motorsports, and Turbonetics / PTE. Through the dark and mist, we have been quietly testing the Turbonetics NX2 drop-in turbocharger unit on our 2016 Ford Mustang Ecoboost and have installed over seven units locally in Arizona.
[row h_align=”center”] [col span=”4″ span__sm=”12″] [ux_image id=”1166″] [/col] [col span=”4″ span__sm=”12″] [ux_image id=”1167″] [/col] [col span=”4″ span__sm=”12″] [ux_image id=”1165″] [/col] [/row] [row style=”collapse” width=”full-width”] [col span=”7″ span__sm=”12″] [ux_banner height=”450px” bg_color=”rgb(221, 51, 51)”] [text_box width=”83″ position_x=”50″ position_y=”50″]We have been through over five turbos and two different tunes within that time. I am approaching over 30,000 miles on our last prototype unit with zero issues. To answer the general question that we find a bit funny.. yes, our Mustang is bone stock inside the engine. Our Mustang is equipped with every Full-Race Motorsport goodie possible, from its charge pipes, blow-off valve, intercooler, cold air intake, downpipe, and race-spec exhaust. Providing over 27 pounds of boost to our 2.3 liter Ford Ecoboost Engine is the Turbonetics NX2. Why do we call it a drop-in unit? Because it is precisely that. With ZERO modification, stock charge piping, blow-off valve, and intercooler, this turbocharger is able to be installed in a matter of hours.
[/text_box] [/ux_banner] [/col] [col span=”5″ span__sm=”12″ padding=”0px 0px 0px 24px”] [ux_products col_spacing=”normal” columns=”1″ ids=”1051″] [/col] [/row] [section bg_color=”rgb(255, 255, 255)” padding=”0px”] [row h_align=”center”] [col span=”6″ span__sm=”12″ align=”center”]STEP BY STEP
[/col] [/row] [row style=”small”] [col span=”4″ span__sm=”12″] [ux_banner height=”360px” bg=”2592″ bg_size=”original” bg_overlay=”rgba(254, 130, 108, 0.72)” bg_pos=”53% 62%” hover=”overlay-add”] [text_box hover=”zoom-in” position_x=”50″ position_y=”50″]
SIZE MATTERS
[/text_box] [/ux_banner] [/col] [col span=”4″ span__sm=”12″] [ux_banner height=”360px” bg=”2593″ bg_size=”original” bg_overlay=”rgba(254, 130, 108, 0.72)” bg_pos=”51% 45%” hover=”overlay-add”] [text_box hover=”zoom-in” position_x=”50″ position_y=”50″]TWIN SCROLL
[/text_box] [/ux_banner] [/col] [col span=”4″ span__sm=”12″] [ux_banner height=”360px” bg=”2594″ bg_size=”original” bg_overlay=”rgba(254, 130, 108, 0.72)” bg_pos=”42% 38%” hover=”overlay-add”] [text_box hover=”zoom-in” position_x=”50″ position_y=”50″]520+ WHP
[/text_box] [/ux_banner] [/col] [/row] [/section] [gap]Before installing the turbo, we got a baseline on our Mustang. Stock turbo, 91 Octane, full bolt-ons, and no tune, we made 310WHP with 312WTQ. Freak of nature? Who knows, but this car did rip on the stock turbo.
[gap] [section bg=”2183″ bg_size=”original” bg_overlay=”rgba(0,0,0,.5)” bg_pos=”93% 46%” padding=”0px” height=”0px”] [row] [col span__sm=”12″] [gap]factory Numbers
[/col] [/row] [ux_banner_grid spacing=”xsmall” height=”423″] [col_grid span=”6″ span__sm=”13″ height=”2-3″] [ux_banner height=”500px” bg=”2595″ bg_pos=”26% 82%”] [text_box text_color=”dark” position_x=”50″ position_y=”50″] [/text_box] [/ux_banner] [/col_grid] [col_grid span=”6″ span__sm=”12″ height=”1-3″] [ux_banner height=”500px” bg=”2597″ bg_pos=”67% 61%”] [text_box width__sm=”60″ position_x=”50″ position_y=”50″] [/text_box] [/ux_banner] [/col_grid] [col_grid span=”6″ span__sm=”13″ height=”1-3″] [ux_image id=”2941″] [/col_grid] [/ux_banner_grid] [/section] [gap] [row style=”collapse” width=”full-width”] [col span=”6″ span__sm=”12″] [ux_banner height=”500px” height__sm=”500px” bg=”2946″ video_sound=”true” video_loop=”false”] [text_box width__sm=”60″ position_x=”50″ position_y=”50″] [video_button video=”https://www.youtube.com/watch?v=-HHU2O1zdgc”] [/text_box] [/ux_banner] [/col] [col span=”6″ span__sm=”12″] [ux_banner height=”500px” height__sm=”450px” bg_color=”rgb(255,255,255)”] [text_box text_color=”dark” width=”80″ width__sm=”73″ scale=”110″ position_x=”50″ position_y=”50″ text_align=”left”]The question everyone has been asking is, what power was made when you installed the turbo? For the time being, that is being kept a secret, but to let you in on some numbers, we made over 450WTQ. Our Mustang needs to be equipped with auxiliary fuel; we ran into some fueling issues there. We are working as fast as possible to get that issue solved and back on the dyno to make a full pull on MAXIMUM boost. The car runs a 91 octane, and MS109 Race Gas Map is tuned on a Cobb Access Port. The turbo pulls HARD throughout the entire RPM range and provides near-stock spool time assisted by the dual ball bearing, billet compressor wheel, and twin-scroll design.
[/text_box] [/ux_banner] [gap] [/col] [/row] [row style=”collapse” width=”full-width”] [col span=”6″ span__sm=”12″] [ux_banner height=”500px” height__sm=”450px” bg_color=”rgb(255,255,255)”] [text_box text_color=”dark” width=”80″ width__sm=”73″ scale=”110″ position_x=”50″ position_y=”50″ text_align=”left”]We have been working on something for the past nine months that we are getting ready to share in the near future, but in the meantime, we are excited to announce that we have sold AND installed our very first Turbonetics turbo to a local client in Arizona. Chris was fantastic to work with, and best yet, it was great to see his reaction when he rode in our Mustang. He complimented how strong the power came on and how much quicker it was than his stock turbo-tuned E30.
[/text_box] [/ux_banner] [gap] [/col] [col span=”6″ span__sm=”12″] [ux_banner height=”500px” height__sm=”500px” bg=”2813″ bg_pos=”46% 54%” video_sound=”true” video_loop=”false”] [text_box width__sm=”60″ position_x=”50″ position_y=”50″] [/text_box] [/ux_banner] [/col] [/row] [ux_slider nav_color=”dark”] [ux_image id=”2916″ image_size=”original” height=”56.25%”] [ux_image id=”2915″ image_size=”original” height=”56.25%”] [/ux_slider] [gap]Here is Chris’ actual Turbonetics NX2 Drop In Turbocharger for his 2017 Ford Mustang Ecoboost.
[ux_banner_grid] [col_grid height=”2-3″] [ux_image id=”2917″] [/col_grid] [col_grid span=”4″ height=”1-3″] [ux_image id=”2911″] [/col_grid] [col_grid span=”4″ height=”1-3″] [ux_image id=”2914″] [/col_grid] [col_grid span=”4″ height=”1-3″] [ux_image id=”2913″] [/col_grid] [/ux_banner_grid] [row style=”collapse” width=”full-width”] [col span=”6″ span__sm=”12″] [gap height=”95px”] [ux_products columns=”1″ ids=”1312″] [/col] [col span=”6″ span__sm=”12″] [ux_banner height=”728px” bg_color=”rgb(138, 78, 78)”] [text_box width=”84″ width__sm=”67″ position_x=”50″ position_y=”50″] [gap height=”15px”]We’ll walk you step by step through this installation. A lift is recommended if you have one. Essential tools are required, including a complete metric set, 3/8 ratchet, and needle-nose pliers. You will lose both oil and coolant throughout this process. We lost almost 1 quart of coolant and a decent amount of oil during our installation. We take zero risks regarding lubrication and only recommend the best replacement fluids for your Mustang. Trusted by nearly all Le-Mans Racing teams, Ford Performance / Roush Road Racing / Kohr Motorsports Ford GT4 Mustangs, Motul Lubricants lead the industry in ultimate protection.
What will you need exactly?
- 1 Turbonetics NX2 Turbocharger
- 3 Cans of Motul 300v 5W30 (Recommended)
- 1 Bottle of Motul MoCool
- 1 Jug of distilled water
- 1 Ford Motorcraft Oil Filter
- Drip pan / Oil catch
- Basic Tool Set (Metric)
- Lift is recommended, but ramps or a jack will work just fine (ALWAYS make sure to use jack stands)
- Cobb Access Port (Highly recommend or any tuner)
- Some banging tunes to get you excited about this install
First, ensure the car is completely cooled off; if not… You’re more than welcome to find out and comment on this post. Allen begins by removing the stock intake and hot side charge pipe.
[gap] [ux_banner_grid height=”301″] [col_grid span=”4″] [ux_image id=”2924″] [/col_grid] [col_grid span=”4″] [ux_image id=”2925″] [/col_grid] [col_grid span=”4″] [ux_image id=”2926″] [/col_grid] [/ux_banner_grid]Carefully remove the coolant and oil lines from the OEM turbocharger. Do not remove the oil drain from the block; disconnect it from the CHRA / turbocharger. Again, we warn you to ensure the car is cooled; if not, please comment on this post to tell us what happened. Disconnect your O2 Sensor from the back of the head. Using needle-nose pliers, remove all vacuum lines connected to the turbo. There are two bolts on the back of the turbo; you must loosen these to remove either your aftermarket or stock downpipe. 4 bolts hold the turbocharger to the head, two on top and two on the bottom. If you haven’t had 3rd-degree burns, remove the four nuts and others holding the heat shield. Keep the heat shield as you will reuse it. The turbo should be utterly loose; pull it straight out and run to the nearest stereo to blast your favorite song as we are ready to start reassembly with your new turbo.
[ux_slider nav_color=”dark”] [ux_image id=”2930″ image_size=”original” height=”56.25%”] [ux_image id=”2931″ image_size=”original” height=”56.25%”] [ux_image id=”2932″ height=”56.25%”] [/ux_slider] [gap] [row v_align=”middle”] [col span=”6″ span__sm=”12″]Let’s start by prepping the turbo. Install the two provided studs into the turbine housing; these will hold your OEM or aftermarket downpipe in place. Remove the OEM turbo gasket on the head. Install the supplied Ford OEM gasket, and make sure that the 90-degree lip of the gasket is facing outward. Remove and install the provided OEM Ford O-Rings onto your oil and coolant lines. You are now ready to get this bad boy into your Ecoboost. Install is straightforward; how you removed the OEM turbo is how you installed the new unit. Ensure it is flat against the head, install the heat shield over the turbine side, and use the new OEM hardware provided. Reconnect the downpipe using the provided Ford OEM downpipe flange; the lip side faces the turbine, and the convex side faces the downpipe.
[/col] [col span=”6″ span__sm=”12″] [ux_image id=”2934″] [ux_image id=”2933″ image_size=”original”] [/col] [/row] [ux_slider nav_color=”dark”] [ux_image id=”2938″ image_size=”original”] [ux_image id=”2937″ image_size=”original”] [ux_image id=”2936″] [/ux_slider] [gap]Connect your O2 sensor and get ready for the final pieces. Install the provided intake adapter, followed by your modified or stock intake tube. Attach your OEM or modified charge piping to the turbo and intercooler. From there, you are ready to attach all your vacuum lines. Stand back, breathe heavily, and prepare for some serious power out of your Ecoboost.
[gap] [ux_image id=”2939″ image_size=”original”] [gap] [row v_align=”middle”] [col span=”6″ span__sm=”12″] [ux_image id=”2940″] [/col] [col span=”6″ span__sm=”12″]But before we start your car and you did opt for an oil change, take this time to dive under the car and remove your old oil filter and drain plug. After a few minutes of draining your oil, install your brand new OEM oil filter, and make sure to put a thin layer of oil on the filter to make removal easy. Tighten your drain plug and pour 6 quarts of Motul Oil into the fill cap. Open your coolant reservoir and dump an entire can of Motul Mocool; later, you will warm the car up to see how much-distilled water you need to add. (BUT NOT YET) Step back and marvel at your success. Or if we did your install, smile big cause you’re on camera. Take a Snapchat or do it for the gram at this point.
[/col] [/row]Before we fire this party up, let’s review a quick checklist of parts.
- Check oil level
- The drain plug is tight
- O2 is reconnected
- All Vacuum lines are secured
- Hose clamps are tight
- Turbine-to-head nuts are tightened
- Downpipe nuts are tighten
If all of that checks out, we assume that you have a tuner at this point. If you still need to, you can purchase a custom tune from us below. If you already have a tuner, communicate with them to get a baseline map that uses wastegate pressure, 18PSI. Upload your new tune into your programmer, reset your oil life, and now you are ready for your first start-up.
YOUR MUSTANG WILL SMOKE. That does not mean the world is ending. You will see visible smoke from the turbine and out of the exhaust. Do not be alarmed; this is only oil-coated residue to prevent rust. Yes, it will smell, stay calm and let it burn off. With a flashlight, check your turbocharger for ANY leaks. Check for engine codes; if all is good, let’s go for a test drive.
Overall, this install will take an experienced tech, which will take 1 hour and a half, and an amateur enthusiast, around four and a half hours, depending on your lift. The difficulty of the job? Around 5/10, with removing the actual turbo being the most challenging part.
We highly recommend purchasing a tune from us after installing your new turbocharger. You are safe to drive on a baseline tune, but you will not have optimum performance. If you decide to run this turbo un-tuned, we cannot guarantee ANY WARRANTY, PROTECTION, OR SAFEGUARD of your Mustang’s existence.
To make more than 420WHP, you will need a more significant high-pressure fuel pump and injectors. If you do not want to do that, you can still run E30 or MS109 fuel. We have a vendor that we can recommend that provides a Ready To Run kit. If you want to make more than 550WHP, please contact us for other turbo kit options.
*Install, dyno, and performance video coming soon.
Sales@ffperformance.co
480 576 8606
Charles Siritho


